Quantcast
Channel: Recreation – The Survival Place Blog
Viewing all 77 articles
Browse latest View live

There’s No Place Like Home

$
0
0

I read a lot about people’s bug-out bags (BOB), like that’s one of the first things one should prepare. Well, my “Plan A” is more focused on sheltering-in-place than bugging out. So when it comes to interesting kits, a get home bag (GHB) is a higher priority for me. A GHB is a kit one keeps at work, school, or in the car to help one get home–by foot if needed–in an emergency. As I began thinking what to put in my GHB, I decided to start with a plan, then build a kit to help me accomplish that plan.

I started by going to Google maps for directions from my office to my home. I made sure to click the “walking” icon, and was presented with a route of 6.8 miles, taking an estimated 2:15 to walk. In the entirely probable event that the roads would be clear and passable, I could be home in just minutes. But it is prudent to have a plan for getting home when one can’t drive as well. It pays to consider your route from a pedestrian’s perspective, not just that of a driver. In analyzing the things I would pass along the suggested route, I discovered:
  • About 2/3 of the route was major streets. Side streets in my area are purposely designed NOT to allow through traffic, and most “short cuts” from one closed-off set of side streets to another would have me crossing difficult terrain–ravines, fences, an 8-lane highway, a lagoon, etc.
  • About 1/3 of the route was heavily developed retail–several “big box” department stores, two malls, several strip malls, grocery stores, fast food, etc. This would be great if I need to pick up supplies (on foot?) but a negative if there’s any panic buying, looting, etc. My shelter-in-place plan is specifically designed to keep me out of such places at such times.
  • There are several stretches with no sidewalks and narrow shoulders not really meant for pedestrian traffic.
  • The most direct route and obvious alternates funnel into just a few choke points to cross two eight-lane highways and a lagoon.

I noted convenient railroad tracks passing within 100 yards of both my office and my home; although the trip by rail would take almost an hour to cover perhaps a bit over 7 miles and require one transfer, by walking along the tracks I might avoid the heavily-trafficked areas.

  • It could take me longer to walk this route because of the uneven terrain, but I would steer clear of panic shoppers and looters.
  • There might be unique dangers along the tracks. Since I don’t walk them normally, I don’t know what they might be.
  • I could parallel the tracks to make better time if no real problem with unrest, then switch to the tracks if I see trouble brewing.

Since there are pros and cons whether traveling along roads or railroad tracks, I decided to prepare for two routes. I modified my street route to pass through more residential areas and less retail areas, noting points at which I could cut over to the railroad tracks. No map was needed for the railroad tracks, as there is literally one single turn, and the end point is very familiar to me. The road map identifies points where I could abandon one route and take the other.
My modified road map came in at 8 miles taking an estimated 2:39 to walk. It avoided all major retail centers, with just two 3-block stretches of light retail, mostly mom-and-pop establishments. It crossed just one freeway at one lightly-trafficked point, and came to just one place where the roads funneled (crossing a lagoon). It passes three small parks, where one might be able to build a small fire or take a nap behind some bushes. I consider the extra time and distance walking to be well worth it. My plan for getting home from the office:

  1. If I can drive home normally, great. I plan to follow my walking path rather than my normal route through heavy retail.
  2. If roads are blocked, I’ll take to foot.
  3. If roads seem dangerous, I’ll follow the railroad right-of-way.
  4. If the railroad route gets sketchy, I can cut back over to the roads.

So, my next issue is what gear will I need for an 8+ mile walk through suburbia? Here are some possible concerns and potential answers:

Concern Answer
I’m wearing dress shoes or flip-flops comfortable walking shoes or boots foot care kit
hunger/thirst water gatorade powder energy bars/candy cash
biology toilet paper anti-diarrheal pills trowel
sun sunscreen hat long-sleeve shirt long pants prescription sun glasses
heat water Gatorade powder water filter chlorine pills
cold Bic lighter waterproof matches layers of clothing energy bars/candy camp knife knit cap
rain rain coat or poncho water resistant shoes or boots
darkness flashlight batteries
communications ham HT see communications plan
trip/fall first aid kit for cuts/scrapes pain reliever mechanic’s gloves
twisted ankle bum knee walking stick ace bandage aspirin/non-aspirin pain reliever
physical/medical extra eyeglasses prescription meds
Unforseen problems with route area map
smoke from structure fires N95 mask bandana
violent people whistle pepper spray walking stick cash
loose dogs pepper spray a walking stick–nice solid wood, not collapsible aluminum

In looking over my kit, I should be fine wearing the appropriate clothing and carrying a day pack (most natural) or a load-bearing harness (more comfortable); I could put everything in a file box in the office, and the stick will fit nicely behind my desk against the wall. In addition to my normal EDC, here are the planned contents of my GHB:

  • Cash ($40 in 5′s and 1′s, $10 in quarters)
  • Map of the area, waterproofed, with route marked and annotated
  • Comfortable water-resistant shoes or hiking boots
  • Foot care kit
  • 2 liters of water
  • Water filter
  • Chlorine tablets
  • Gatorade Perform Powder Packets
  • 2 energy bars
  • 1 serving candy
  • Toilet paper
  • Lightweight trowel
  • Microfiber convertible hiking pants
  • Synthetic long-sleeved pullover shirt
  • Hat
  • Knit cap
  • Bandana
  • Mechanic’s gloves
  • Rain coat/poncho
  • Prescription sunglasses
  • Prescription eyeglasses
  • Sunscreen
  • Bic lighter
  • Waterproof matches
  • Camp knife
  • Flashlight
  • Batteries
  • Handheld ham radio
  • Copy of communications plan
  • First aid kit
  • -Include treatments for cuts and scrapes
  • -Include ace bandage
  • -Include aspirin or non-aspirin pain reliever
  • -Include anti-diarrheal
  • -Include antihistimine
  • -Include any prescription medicines
  • Whistle
  • Pepper spray
  • Walking stick

Laid out like this, it is easy to see how my GHB perfectly matches my plan for getting home. This should not be what your GHB looks like, especially if you have to cross a mountain range or large river, or could have to tromp through snow, or could end up spending several nights on the road, etc. Why not go through these steps yourself: plot a route, evaluate your concerns, then build a GHB that addresses those concerns.
As for me, my next step is to scout my route in my vehicle. In particular, I’ll look for manageable short-cuts from one dead-end street to another. After that, this plan isn’t finished until I walk the walk! How long does it take ME under ideal conditions? Is my load too heavy, or did I miss something I wish I had? A final adjustment to the map, a final tweak to my GHB, and I’ll be good to go! – Still Getting Ready


Ammo Inventory Spreadsheet – Free Download

$
0
0

Ammo Inventory Spreadsheet – Free Download

Posted by P. Henry

As we Preppers do our thing of planning, prioritizing and eventually acquiring supplies, skills and knowledge at some point you might need a hand organizing everything you have. There might be one or two of you out there with a set up like the have in the picture for this post, but the rest of us need some help. For most people this is simple and if you are really anal retentive, you have colored charts, lists, binders and 3 x 5 cards to keep all of your supplies organized. That isn’t me.

For some things it is simple to keep most prepping items in one place. Food storage for example, has a pantry to go into and as long as we have and keep an organized pantry or other system so we know what we have, everything is fine. If I am running low on supplies I can go to the pantry, check my inventory levels and adjust as necessary. Or like this evening, I saw that a few new cans of soup had not been put away correctly and needed to find the right spot for them. OK, really who’s anal now?

Water storage is another easy one because that rarely changes or moves. I have several places where water is stored, but outside of rotating the stored water for fresh water every six months, we don’t need to keep as close an eye on that. Long term fuel storage is another one that is fairly easy.

There are some survival items that will get used like duct tape, medical supplies and camping/backpacking gear but most of these items are used frequently enough that I am purchasing more on a frequent basis, so again, keeping track isn’t that urgent because anything I would need multiples of, I usually already have or routinely pickup when I am out shopping for anything related to prepping.

When it comes to items like food and ammunition, we are generally looking to stock up on as much as we need and knowing where we are in that process takes a little organizational skill. For ammunition you need for that survival firearm, the easiest way to do this for me was to write everything down on a list and track how much I have on hand, what my desired quantities were, how far to my goals and how much money I would be looking to outlay to reach those goals. Additionally, I wanted to keep track of all of this because unlike food in the pantry, I have ammo all over the place.

The System

You can find inventory spreadsheets out on the internet, but I just quickly created my own one day after I got a wild hair and grabbed all of the ammo I had in various places and decided to count it. Up until that time, I would just buy a box or several hundred rounds of whatever calibers I had on hand, or had just purchased. I had a rough idea of how much I had, but nothing precise and I was worried that I might be buying the wrong things. It was time to track my ammo.

Excel is a great tool for keeping track of inventory.

Excel is a great tool for keeping track of inventory.

After I had a big pile of ammunition in various boxes and configurations weighing down my kitchen table, and sorting it into calibers (and smiling proudly) I started separating the handgun ammo into ball and hollow-point. Some spreadsheets go so far as to separate by manufacturer, but for me that wasn’t important. I simply wanted to know how much I needed to have and what was on hand. The Spreadsheet was pretty simple; I listed all of the caliber types I had, entered the quantity of each and created a column for what my goal was. For instance, my goal for each hand gun was to have 1000 rounds of ammo for each. I then created a simple formula to subtract the on hand count from the goal to give me a variance. When I did this for all my calibers, I could easily sort the spreadsheet on the variance column to see what I needed the most of. Now, when I go to the gun show, I know that I really need more .30-.06 ammo than 9 HP for example so I can make an informed purchase.

I also added some other fields like the average cost for a box so I would know how much cash (roughly) I was still looking to spend to meet my goals. The prices change all the time, so what is in the spreadsheet might not be accurate. Everything is open and you are free to change this as you see fit if you think this could help you.

The spreadsheet is on our Resources page in the “Downloads” section and if you have any lists you have created yourself and want to share, please let me know. – The Prepper Journal


Concealed Carry for the Petite Woman

$
0
0

Concealed Carry for the Petite Woman

Posted by Falia Leigh

Numerous factors must be just right in order for concealed carry to work well, and concealment can change daily depending on our clothes and activities. Gun size, on-body carry position, holster angle, and ride height are all things to consider, and just one problematic factor can be frustrating enough to discourage us from carrying. Since our bodies and gun preferences are all different, the CC method that works best for one person may not work for another; therefore, the more perspectives we can get from individuals similar to ourselves, the better.

As a petite 5-foot-4-inch female of 118 lbs who carries a gun everywhere she goes, I’ll be the first to admit that concealed carry can still be a headache on certain days, resulting in a pile of clothes, guns, and holsters. In addition, a lazy week and a change in eating habits can (and will) make my pants fit a bit more snugly than usual. What woman really wants to squeeze a gun anywhere inside her pants when they are feeling tight already?

Women’s clothes are often fitted to accentuate our curvy figures, and our miniscule pockets are only capable of holding dainty things. Most of us just want to wear what we want to wear, without making getting dressed another chore to add to the daily list. Thankfully, there are many holster options available today, even for petite women, because I sure wouldn’t carry a gun on my body daily if it were not both comfortable and concealable.

ankle holsterWomen definitely have an advantage with ankle holsters since they are very easy to access when wearing long skirts and dresses. One with both a calf strap and soft inner padding, such as this Galco Ankle Lite, provides both comfort and stability.

Along with the high number of holster options available for us to choose from, there are also a lot of places to position them around our bodies. INside-the-waistband (IWB), OUTside-the-waistband (OWB), shoulder, ankle, bra, pocket, thigh, appendix, and purse carry are the main CC methods that come to mind. Once you figure out where you can actually conceal on your body, then there are more choices to pick from. Leather, Kydex, hybrid leather/Kydex, and fabric holsters all vary in terms of comfort and retention. Numerous holster choices may be overwhelming, but there is no doubt in my mind that something will work for every licensed woman who wishes to conceal carry, if she is willing to spend some time going through her options and is truly determined to carry her gun on-body.

First things first, I recommend you decide which gun you most want to carry with you on a regular basis, and then try to make concealment work on your body with that gun. If you are unable to find a method of concealment (holster and body position) that works for that particular gun, then switching to a smaller gun can definitely help. A tiny .380 might conceal the best for all of us, but perhaps you’d actually prefer a slightly bigger (but still small) gun like a 9mm Glock 26 or a Ruger LC9. Gun selection is truly a matter of individual preference, and although very small guns conceal the best on my petite frame, other guns can conceal well too, depending on the season.

In the summer, I can only really conceal a .380 or a NAA mini .22 revolver on my body. In the winter, however, any gun can be concealed underneath heavy clothing. I’d prefer to carry my double-stack S&W M&P compact 9mm year-round, but with my small body size, I just can’t conceal it well enough with normal summer outfits. I’m not going to stop wearing shorts and tank tops in 90 degree weather in order to conceal my biggest gun, so I simply downsize to the smaller Ruger LCP or Kel-Tec P-3AT during those months.

Thigh holsterThigh holsters, like one from Clament Custom Leather, can work well for smaller women with lightweight guns, when worn under loose, knee-length skirts and dresses. When angled out the backside of the leg, they are less likely to rub when walking.

Once the weather starts cooling off, cover garments become much easier to incorporate back into daily wear, and it becomes a pleasure to carry the M&P again. Sweatshirts, jackets, vests, and sweaters are all excellent concealed carry helpers for those times of year when the temperature drops a bit. Even lightweight, sleeveless vests can be very helpful for concealment during the summer, although I’ve found darker colors to always conceal better than lighter ones.

I didn’t want to drastically alter my wardrobe to start carrying a gun, but being a new CC licensee was a great excuse to peruse eBay, thrift shops, and the mall, since I didn’t own many sleeveless vests or cover garments at the time. I wasn’t going to buy anything that I wouldn’t normally wear, so shopping for CC clothing was my own form of research. I asked myself, “What types of cover pieces could you add to your closet that you would still wear, even if you weren’t carrying a gun?”

Although I didn’t set out to change my clothing style, I will admit that finding a few select pieces sure did help with my concealment efforts. Having a few sleeveless vests in your wardrobe can make a huge difference, and shopping for new cover garments can be a true highlight of concealed carry. If you start out struggling with the concealment of your firearm, I highly recommend doing some shopping research of your own and not giving up until you find a few cover-ups that you’d be excited to wear any day of the week.

OWB holsterA long cover-garment is essential for OWB concealment, since you must cover both the gun and the holster. Concealing a mid-sized gun like this compact S&W M&P in an OWB holster can be hard for a petite woman, so switching to an IWB holster and/or a smaller gun can help.

Also, if you are like me and normally wear tighter pants that don’t allow for much wiggle room, definitely consider buying a few pairs that are one size up from what you normally wear, so that you can better experiment with IWB carry. I didn’t give into that for the longest time, but I’m so glad that I finally have because IWB holsters have become much more comfortable for me.

If you are going to spend the money on a concealed carry handgun, definitely consider CC clothing to be an investment to the cause—you may no longer have to leave your gun at home! You may even come to find that when you’re out shopping in the future, garments that are beneficial for concealed carry really jump out at you. Don’t forget that the ability to wear unique, feminine cover garments is one fun luxury of being a woman.

For my very first concealed carry gun, I chose a simple, lightweight revolver: the Ruger LCR. I experimented with all different types of holsters for that one gun, and of course I kept hitting walls. Some of my pants lacked belt loops, which ruled out all belt holsters. Others were very tight at the ankles, which ruled out any ankle carry. All dresses and most skirts did not work with a belt holster, and all of my pants pockets were too small for any gun. If you really want to carry your gun, however, persistence pays off. I have learned that on my body, with the types of fitted clothing I usually wear, different outfits work better with different types of holsters.

My wide-leg pants or long, floor-length skirts and dresses always favor an ankle holster, especially when they don’t have belt loops or the fit is too snug to accommodate a gun in the waistband. Knee-length skirts and dresses often work well with a thigh holster, as long as the gun being carried is small and lightweight. I have found, however, that skirts made of stiff, heavy fabrics can make drawing from the thigh holster more difficult, and skirts worn above the knee are often too short for a thigh holster to conceal adequately.

IWB holsterJean skirts often have belt loops, which means ‘belted IWB holsters’ can still be worn in the summer. For a woman who carries a small 380, an adjustable IWB holster, like this Crossbreed Minituck, may conceal very well underneath a loose tank top or T-shirts.

Instead of thigh carry for those skirts, an IWB holster can work much better. Depending on whether or not the skirt has belt loops, I use either a Crossbreed MiniTuck or a clip-less Remora holster, positioned low in the waistband for best concealment. Not only is an IWB holster my CC method of choice with shorter skirts, but it is also my main choice for shorts, pants or jeans, paired with a regular T-shirt, hooded sweatshirt, vest, or cover garment.

A gun can also be concealed outside the waistband if you are wearing a longer, heavier sweater or jacket, although OWB holsters are bulkier in general, making them harder to conceal. Very specific cover pieces, like a roomy winter coat or a dark colored vest, can work especially well for most CC methods, including OWB, shoulder, and pocket. However, since concealable clothing options for smaller women can be limited with both shoulder and pocket holsters, I still carry either IWB or OWB in the winter.

Sometimes a woman, petite or not, has no other option but to carry her gun in a purse or bag. For those occasions, it is beneficial to have a dedicated gun purse, with a separate compartment for your gun. As a fail-safe option for when I’m either running out the door or heading on a more adventurous trek, I conveniently holster my gun inside a Gun Tote’n Mamas shoulder pouch or a Disse Gear concealed carry bag. I’ve also recently discovered a unique, new bra-style holster called the “Flashbang” which is made for various small guns. It may work well with most female clothing, aside from dresses and sports bras, although I still have yet to try it.

OWB holstersA straight drop (neutral cant), as shown with this Crossbreed SnapSlide OWB, is meant to be worn directly on your side in the 3:00 or 9:00 position. This angle is great for the range, although it doesn’t conceal well on a petite woman. (bottom) A slight forward rake, or even a more “extreme” forward rake, as seen on this Lobo Gun Leather OWB, can conceal very well for a petite woman in the 4:00 position. This angle helps keep the grip of the gun from poking through a cover garment.

Most of the time, I truly prefer IWB carry, and the sweet spot on my small frame is always the 4 o’clock position, directly behind my strong-side (right) hip. If I so much as even think about small of the back or appendix carry with my slim build, however, lo and behold, quite the bulge appears! For some women, those positions might work, so don’t rule them out until you try them yourself. They just don’t conceal well with my particular physique.

I like to wear shorter tops and cover garments too, so the main highlight for me with an IWB holster is that you only have to conceal the gun and holster above your pant line, since most of the gun and holster is already concealed within your pants. With an OWB holster, however, you have to wear a longer shirt or cover-up, since you must cover not only the entire gun, but the entire holster as well.

With any IWB holster, both the ride height (depth of the holster and gun in your pants) and cant (degree angle or “rake” your gun is tilted at) will make or break your IWB concealment attempts. The Crossbreed SuperTuck was my first IWB holster, and I’m so glad it was because that specific holster is adjustable for both ride height and cant. An adjustable holster is beneficial, especially for those starting out, so you can figure out exactly how you need to position a holster on your own body for it to conceal.

For me, a lower ride height conceals best, since I often wear fitted tops. Also, a more extreme forward cant works the best for me, since that angle is least likely to allow the butt of a gun to stick out the back of my shirt.

clipless IWB holsterMany skirts lack the belt loops needed for waistband holsters, while others are too short for thigh holsters. A “clip-less” IWB holster with a tacky exterior surface, like this Remora No-Clip IWB, is a good option for a skirt that fits snug.

The versatility that different holster options provide is terrific and no single holster will work for all applications. With that being said, I’ve also come to believe that it is worth making small compromises in our wardrobe in order to carry a gun in the same position on most days. Since it is not a good idea to frequently switch your on-body carry location from day to day, picking a main style of clothing and preferred carry method is beneficial. If you wear a lot of long skirts, an ankle holster might be perfect for most days. If you prefer a lot of baggy hooded sweatshirts and T-shirts, an IWB holster might be the main way to go.

The problem is, if you constantly switch where you wear your holster, it may not be where you attempt to retrieve it from should you ever have to use it. It would be detrimental to forget where you are wearing your holster on the day that you need your gun, and you surely don’t ever want to fumble with getting it out. If you pick one or two carry methods for wearing your gun most of the time, then it will be easier to fit in plenty of crucial drawing and shooting practice at the range.

I am so grateful for the right to carry a concealed firearm for protection, and as CC permit holders, we should all respect the responsibility that entails. No matter which carry methods you choose, it is most important to be comfortable with your firearm and know how to handle it safely. – The Prepper Journal

 Read the original article on US Concealed Carry

[ Falia Leigh blogs online at the “Falia Freedom Journal,” http://www.faliaphotography.com. If you would like to see video demonstrations of the various carry methods described above, check out the author’s YouTube channel at www.youtube.com/faliaphotography ]


Gun Sight 101

$
0
0

gun-sight-101

By Ken Jorgustin

So having spent some time at the range recently with my new Smith & Wesson M&P45, I thought I would share a ‘back to basics’ tip that helped me get better on target after expending my first magazine with poor results…

It’s like any sport, skill, technique… we sometimes get distracted with the effects or experiences of something new, which sometimes leads to over-analyzing things, and once in awhile we lose sight of the basic fundamental techniques of what we are setting out to accomplish. In this instance, I was simply trying to hit a standard pistol target at 30 feet, ideally somewhere within the 6-inch diameter ‘black’ rings of the paper target. Heck… anywhere within the 10-inch target itself would be a good start… or even hitting the perimeter of the cardboard that is holding the target… which was where most of my first bullets went.

Admittedly though, this was a new pistol for me, and a larger caliber that I’ve not had before. I know, I know… excuses.

In any event, after some good-hearted teasing from a few of the other folks in the pistol house, we began to chat about the basic fundamentals of shooting straight, including the following two things, which got me back on my game…

1. Focus your eye on the front gun sight

2. Pay attention to your gun sight air gaps (lining up the dots)

While I knew that my grip and my stance was good, I had become more mentally focused on the fact that it was a new firearm, I was unfamiliar with the trigger pull/tension versus when it would fire, and I had even started to ‘anticipate’ the shot, which really makes for a problem.

On my second magazine, I settled down, and thought only of the fundamentals. I focused my dominant eye on the front gun site, while being fully aware of the slightly blurry rear sight and the blurry target itself.

As basic as it may sound (and be), the fact is that in order to shoot straight, or accurately at your intended target, you must pay attention to properly lining up the gun sight dots. Any slight misalignment WILL cause the bullet to travel either left, right, high, or low. The shorter the barrel of the gun, the more pronounced and extreme this will be. And naturally, the further away the target, the more these effects will apply.

I had some fun playing with my camera while getting a picture showing the alignment of the front and rear gun sights which illustrate the equal air gap and lining up of the front gun sight dot with the two rear dots. It doesn’t take much to get it misaligned… but once they are lined up, you will shoot straight… provided that your trigger pull doesn’t move the alignment and that you are gripping the gun properly. In any event, the image below gives you an idea. It shows the dots lined up in a row which gives you a proper vertical alignment, and it shows the center dot right in the middle with a slight air gap on each side.

front-rear-gun-sight-dot-alignmnet

The next picture shows the gun sight position which would cause a miss to the left.

gun-sight-shoots-left-of-target

The following picture shows the gun sight position which would cause a miss too high.

gun-sight-shoots-high-of-target

I know that it’s all super basic, but often times getting back to the basics and focusing on the fundamentals helps us improve or re-establish our skill. Besides… it gave me an excuse to play around with my Sony A65 camera.

Appreciate topics of survival, preparedness, risk awareness – or planning for disaster? Read our current articles on Modern Survival Blog


Tips for Trapping & Hunting for Survival

$
0
0

Cool-Hunting-Bird-HD-Wallpaper

By

Hunting, trapping and gathering from nature in a post-SHTF situation probably won’t provide you with all the food you need to survive, but such skills can help to supplement limited supplies. Assuming you aren’t in a totally lifeless urban area, most regions of the world teem with some form of natural life, from bugs and birds to small mammals and larger game.

The most populous wild animals in most of the US include deer, rabbits, nutria, wild ducks and geese, turkey, quail, and pheasant. Many regions also have elk, moose, pronghorn antelope (though they technically aren’t antelope), wild goats and even wild boar. These larger game animals are just what you would want to hunt in a survival situation, but more often than not you may need to focus on smaller prey like rabbits and squirrels.

Don’t Discriminate

Right now, you probably don’t fancy yourself as someone who will eat squirrels, groundhogs or possums, but when times get tough you may discover that such critters are a welcome addition to your dinner table. The rule of thumb is that you shouldn’t be overly discriminatory when it comes to what you will or will not eat in a bare-bones survival situation. The less you discriminate, the more likely it is that you will survive to eat a more refined meal another day.

trapUse Traps

You might not have thought about it, but some of the mouse and rat traps that are available are actually a pretty good investment in case of an emergency. Mice, and rats for that matter, may not be high up on your post-SHTF menu, but if something can catch a rat it can also catch a squirrel or any number of other similarly sized critters. Mouse and rat traps are also great to have on hand simply because they can catch vermin that might try to access you stored food.

Another simple, effective trap is a snare. Easily constructed from paracord, a few dozen snares placed in the right locations can potentially net you a variety of creatures. Snares are great for catching birds and small mammals, including possums and raccoons. In any case, traps of all shapes and sizes are a useful tool in your arsenal and you should make use of them.

Stock Proper Ammunition

If you intend to hunt using a weapon, be sure to stock plenty of the proper ammunition. Your AK-74 or AR-15 rifle for fending off assailants is not quite what you’ll want to take out hunting. A .22 LR or a 12 or 20 gauge shotgun is more suitable for hunting, depending on what kind of game you’re after. Some hunters prefer to use a bow and arrow, or a crossbow, but whatever your weapon of choice be certain you have plenty of ammunition for it.

Get a Good Knife

knife

One of the most useful tools you will need to hunt and /or trap successfully is a reliable knife. Many survivalists and hunters prefer something with a 6” – 9” blade, which should be kept sharp and well cared for at all times. You’ll need a good knife in order to bleed out and field dress any game that you succeed in killing, as well as to assist in butchering larger animals as needed. A good knife can also be used to make snares, prepare kindling, and for self-defense.

Be Patient

Another important aspect of successful hunting is patience. Sometimes you’ve simply got to sit tight and wait out your prey, as in the case of staking out a known watering area, mating ground or feeding area. Getting impatient or trekking all over the countryside is more likely to leave you tired, disappointed and still hungry than to result in a successful hunt and a filled belly.

Practice, Practice, Practice!

As with all things related to prepping, from gardening to cooking to sewing your own clothes, now is the time to practice, practice and practice some more. When it comes to hunting, practice is especially important because you’ll want to be able to successfully hunt and kill something to eat if or when the time comes and you’re starving. Locating and tracking suitable prey is one of the skills that you’ll need to practice in order to be a good hunter, otherwise you’re liable to spend a lot of time searching fruitlessly for something to eat and slowly starving in the interim.

Don’t Eat…

There are some things you shouldn’t eat, though. At the top of the list is already dead animals. Tempting though the meat may be when you’re starving, don’t eat animals that you find dead or dying. Such animals could have died for any number of reasons unknown to you, including poisoning, parasitic infection, disease and so on. Likewise, don’t hunt or consume the meat of animals that are ill, cooking the flesh will not make it safe for consumption.

Drying, Salting & Smokingmeat

To go hand in hand with your hunting and trapping skills, it would also be a good idea to familiarize yourself with the basics of salting, drying and /or smoking meats. Such treatments will allow you to store meats for much longer periods of time, thus ensuring that you and your family have food and that as little of your kill goes to waste as possible. Be sure to stock up on plenty of salt if you know, or anticipate, that you will be doing a substantial amount of hunting to survive.

Other Edible Critters

Depending on your level of squeamishness, there are a variety of less desirable animals that have been (and in some places still are) consumed throughout human history. These include certain species of frogs, certain types of insects, caterpillars, many types of ants, and bees among others. Even turtles, tortoises, and alligators are edible if you can catch them, as are raccoons, skunks, weasels and possums.

Snails, slugs, lizards, geckos and snakes are all potentially edible as well, and you might be surprised by how much nutrition such animals can contain. Bugs such as ants, for instance, are an excellent source of protein. Then there are traditional predators, including bears, wolves, coyotes, foxes, and mountain lions. While you might not want to go out of your way to hunt known predators like these, they are certainly edible if you do happen to kill them. – SurvivoPedia

Find out more about food independence on Backyard Liberty.


How to Defeat Your Fear when SHTF

$
0
0

fear1

By

Fear, when harnessed properly, is an incredible survival tool. When you’re scared, your senses are heightened and your adrenaline is flowing. You’re more sensitive to sights and sounds. You’re a little bit stronger and a little bit faster than you may otherwise be, and these are excellent tools to have. The key is to manage your fear in order to use these tools to your advantage.

Just like every other step to survival, managing your fear is a just a matter of being properly prepared for it. Throughout the following paragraphs, we’re going to discuss ways to defeat your fear when SHTF instead of letting your fear defeat you.

The Downside of Fear

Survival depends almost entirely upon your mental state: it doesn’t matter how much food you have or how good your weapons supply is if you let your fear paralyze you. In a true SHTF scenario, you’re going to be scared; it’s almost a guarantee. Fear is a natural survival response to a threatening situation, so expect it. The key to survival, though, isn’t going to be who isn’t frightened but rather who manages their fear well enough to think around it.

In addition to the advantages of fear that we mentioned above, unmanaged fear can also cause several undesirable side effects that can get you killed. It’s these side effects that make it imperative for you to prepare yourself to defeat your fear and use it to your advantage. Fear can cause:

  • Fight or Flight Response: this is survival 101 for our brain but can be lethal if you let the impulse control you blindly. Running or fighting are going to be your brain’s immediate responses to any extreme threat so be ready to manage this response.
  • Paralysis: This is another ingrained response to extreme threat that your brain uses to make you “invisible” to the threat. Freezing up, both physically and mentally, can be prevented, or at least minimized, by good preparedness.
  • Automatic Response: Reacting blindly without thinking is an extension of fight or flight. You want to act, not react. Again, practicing and preparing for different situations will help re-train your brain to think before you act.
  • Tunnel Vision: Your brain automatically focuses on the threat to the exclusion of everything else in an attempt to determine the best route to survival. Unfortunately, in a SHTF scenario, there will most likely be numerous threats at once. Training your brain to remain focused on the big picture will save your life.

Now that you know what instinctive responses to expect, let’s talk about some of the tactics that you should use to train your brain to manage your fear.fear2

Have a Plan and Practice It

One of the best ways to retrain your brain to react promptly and efficiently in a SHTF situation is to have a plan and to practice it. Muscle memory can help keep you moving in the right direction even when you’re under extreme mental duress. This is the reason that military units do drills: when you’re already prepared to react in a certain way in a given situation, fear isn’t as likely to paralyze you.

  • Have Specific, Varied Plans of Action. Don’t just plan a general escape route that applies to all situations because every situation is going to be different. Have different escape routes based upon some exits being blocked. Practice defensive drills in case escape is impossible.
  • Practice each Plan. You can’t expect your body or your brain to react seamlessly if you don’t actually physically practice each plan. Also, if you don’t practice, you won’t find any glitches in your plans. Practice every plan until it feels automatic and natural to you.
  • Include Your Family in the Drills. By doing this, your brain will be assured that they are doing what they’re supposed to be doing and you can focus on doing your part to ensure survival for all of you.

Know Your Environment

Being intimately familiar with your environment will help your brain to process information and map out a new plan should your original plans go awry. Also, knowing your environment will help you plan for weak spots and will also give you an advantage over any threat, because they likely won’t have the knowledge that you do.

  • Know every entrance and exit
  • Know weak spots such as creaky floor boards, broken elevators, doors that tend to stick, or windy or sun-blind spots that may affect action in the case of attack.
  • Know where rivers or creeks may swell, where trees may fall, or which roads may be impassible so that you can quickly evaluate which escape route will be best based upon the SHTF situation.

Knowing your environment will help your brain to function instead of allowing panic to set in.

fear3Practice Relaxation Techniques

Simple relaxation techniques such as deep breathing, meditation, and yoga can help strengthen your control over your emotions. If you feel panic setting in, a few deep, controlled breaths may mean the difference between life and death. Make this part of your daily lifestyle and when you need them, they’ll be a natural tool that you can use to defeat your fear in a SHTF situation.

Educate Yourself

Knowledge is power. Learn survival techniques including first aid, herbal therapies, outdoor cooking, natural sources of food and water, weapons training, and local procedures so that you know how to survive in your environment. If you’re already confident that you can survive without all of the modern amenities and that you know what to do in case of any emergency, you’ll be less likely to panic and more likely to defeat your fear in a SHTF scenario.

Be Prepared

Being prepared to either bug in or bug out in a SHTF scenario will help you manage your fear. Here are a few tips:

  • Have your bug out bags packed and keep them current.
  • Keep your vehicles in good repair.
  • Keep your weapons clean and at the ready. Teach your family how to safely use them if that’s part of your survival plan.
  • Keep your stockpile up and make sure that you’re rotating so that everything stays fresh.
  • Keep your home and property in good repair so that your property remains safe and secure in case of natural disasters.fear4

Remain Physically Fit

This is one of the most important steps that you can take to manage your fear. If you know that you’re in good physical shape and can handle the physical stress that either escape or fighting will demand, you’ll be more confident and less likely to panic. Exercise is also a great way to gain mental discipline, which will also help you to defeat your fear in a SHTF situation.

Don’t Wait – Start Now

Now that you have some tools that you can use to help you prepare your brain to remain calm in an emergency, practice them. Just like with your emergency drills, training your brain requires repetition and practice. Survival really is dependent upon remaining calm and ready to evaluate any situation, so take these tips and start using them now so that you can defeat your fear in a SHTF scenario. – Survivopedia

Find out more about surviving in a SHTF scenario on Prepper’s Blueprint.


Teamwork In Prepping

$
0
0

Teamwork In Prepping

Posted by Guest Contributor

There is a great fallacy in some circles that the lone wolf is the person who will have the greatest chance of survival if things ever go downhill. Being prepared for any level of disaster or emergency is definitely something that should be a family, group or team effort. One way to look at this is to equate the survival of a group versus individual survival as a baseball game in which one team is complete and the other team has a pitcher that has to cover the outfield, too. This is not only impractical but would completely exhaust the pitcher in a short amount of time. So what does this mean from a preparedness perspective for you?

Get Your Team On Board

In many families or groups, a small percentage of the group can be considered dedicated preppers. There may be only one person who fits the bill. Others could be either half-hearted in their efforts or even all-out resistant to the idea of preparing for disaster. As it was once relayed to me, “If everyone else is unprepared, too, we will fit right in.” It seems that it has become clearer in recent years that if individuals do not prepare themselves, no one else is going to come take care of them, at least for a period of time. So what can be done about this? How do you get others on board with preparedness planning?

There is certainly no single answer to this question; but from my experience, the best approach to take is to be open and honest and help those who are important to you see how preparedness matters so much to you, your family and your inner circle. If you are truly important to your family, friends and community members, they will seriously consider what you have to say.

If you are a lone wolf type, take into consideration finding some like-minded people who are in close proximity to you so that if there is an emergency or disaster situation, you are not forced to go at it alone.

Select A Group Of Skills Everyone Will Master

In almost any organization there are core skills that every member of the team must know. In an office it might be how to use the copier. Every mechanic knows how to change the oil in a car. There are also universal skills that every member of a team that is preparing for survival should know. The only exception would be those who are not of an appropriate age, lack the capability or do not possess the maturity for certain tasks. Examples of these mandatory skills could be:

  • Marksmanship: How to properly fire, clean and maintain a gun.
  • Cooking: How to prepare a meal for an individual or the group.
  • Communication: Using a CB or walkabout radio to communicate.
  • Animal husbandry: How to milk a cow or collect the eggs from the hens every day.
  • First aid: How to care for an injured or sick person.
  • Gardening: How to properly water and harvest fruits and vegetables.
  • Firefighting: How to properly use a fire extinguisher.

While this concept may seem far-fetched to some, there are many things that can reasonably be expected from almost anyone. Even a 3-year-old can be taught to throw sawdust on top of the pile in the composting toilet, for example.

Determine Roles And Responsibilities

Each person in the group should have a primary and secondary responsibility or specialized skill when possible. If your group has two people, the situation may dictate otherwise. But in a normal family-size unit of two adults and at least two children, this should be feasible. And if you are part of a larger group of families, this is definitely doable. In fact, once primary and secondary roles have been mastered in a larger group, then the group should work on cross-training in each others roles as well as taking on the responsibility of learning new skills.

Examples of potential individual roles/responsibilities include:

  • Security.
  • Power.
  • Water.
  • Food.
  • Medical.
  • Communications.
  • Maintenance.
  • Logistics.
  • Sanitation.
  • Gardening.

Of course, this is not an all-inclusive list. It does cover some of the major areas and systems of support that are an area of concern in a survival situation. The roles that must be assumed will depend on the capabilities and systems that are available to your group. To avoid burnout among the group in performing routine chores and tasks, a “duty roster” or rotational schedule of these tasks could be established to assign different ongoing responsibilities to team members.

In addition to determining who will do what, it is valuable to select a leader to oversee the command and control of a group. For a family this leader will likely be the dominant parent. A group that is not a family should likely look to who the most natural leader is, who is the most experienced in managing tasks and people, or perhaps even who is the most liked person in the group.

Discuss What To Do If Something Does Go Wrong

If one person’s role within the group is to be in charge of the generator and emergency power systems and that person is ill, then what will the group do? These types of situations need to be discussed and alternate plans need to be made to address such problems. This is where secondary responsibilities and cross-training come into play. The subject matter expert in each area will assist the group by teaching his craft to an apprentice.

If the size of your family or group dictates one person taking on every responsibility, this is where strategic partnerships and community building comes into play.  No one person can do everything. Sometimes, it is better to rely on a trustworthy member of your community or inner circle than to try to be the jack-of-all-trades. A prime example where networking is invaluable would be dealing with a downed tree. It is great to know how to cut up a tree with a chain saw. This is a valuable skill to have, but it is not on the same level as trying to remove a tree that has fallen on top of your garage. Taking on this task without the specialized skill necessary could easily wind up getting someone seriously injured or even killed.

Document, Document, Document

As roles are determined, individuals should update the group documentation or create this collection of documentation. This is a great way to get your survival documentation updated and not put the burden all on one person. Each person takes a folder, binder, journal, etc. and compiles all the information he can about his responsibilities and how they fit into the group. This binder should include manuals/operator guides for any pertinent equipment, standard operating procedures, decision points for bugging out or other key events, expansion plans and ways to deal with changes in group size or locations, etc.

There is certainly much more that goes into making sure that your family or group is prepared to appropriately react to an emergency or disaster, but hopefully this serves as grease to help get the wheels turning. The team approach is necessary, and it certainly eases the burden of preparing that is on the group leader or head of household. Lastly, keep in mind that in order to remain effective, a team should always play to its strengths, maintain balance, operate under common goals or a vision, and communicate openly and honestly. – The Prepper Journal

Read the original article by Tom Miller


Firsthand Armed Citizen Experiences

$
0
0

armed-citizen-experiences

By Ken Jorgustin

Studies indicate that firearms are used more than 2-million times a year for personal protection. The following are firsthand experiences of armed citizens who displayed or used their firearm for personal protection…

Hazel Poole, 85, was at home playing with her puppy around 8:30 p.m. when there was a knock at the front door. Little did she know that she would open the door to two masked men wielding knives. Poole wasted no time and dashed to her bedroom where she kept her .38-cal. handgun. With confidence she pointed the gun at the men and ordered them to leave her home or she would shoot. Both men fled without hesitation. -The Star Press, Muncie, IN.

A man in his early 40s entered a nail salon at about 5:30 p.m. and began asking a female employee about purchasing diamonds. When the confused woman told the man she had no money to buy diamonds, he reached into his coat pocket and pulled out a pistol. When a customer getting her nails done saw what was happening, she reached into her purse and pulled out her own firearm. Upon seeing the woman’s gun, the man quickly fled the salon. -Casper Star-Tribune, Casper, WY.

Two men targeted the home of Jerry Stremovihtg, 62, and Kenneth Conley, 53, one evening. Conley was having a meal on the front porch when the two men approached him. They beat him and repeatedly used a taser to subdue him. After gaining entry to the home, the suspects entered Stremovihtg’s bedroom. Stremovihtg met the intruders with a .38-cal revolver. He fired several rounds causing them to flee the home. One suspect, a 35-year-old male, died in the front yard from a gunshot wound. -The Daytona Beach News-Journal, Holly Hill, FL

Gary Cherry was driving at approximately 8:30 a.m. when he noticed two vehicles on the side of the road. Cherry pulled over to help when he saw there was a man holding a woman to the ground face down and stabbing her repeatedly. Cherry, a concealed carry license holder, quickly retrieved his firearm and ordered the man to get on the ground as he dialed 9-1-1. Crystal Ward was traveling the same routed when she spotted Cherry holding the perpetrator at gunpoint at the side of the entrance ramp. Ward stopped to assist and discovered a crying baby boy in one of the vehicles. The suspect was later taken into custody and the victim was flown to a nearby hospital with multiple stab wounds. -Montgomery County Police Reporter, Plum Grove, TX

Two teenage boys were spotted by a neighbor as they loaded items from the cabin next door into a vehicle parked outside. The youths wore what appeared to be blood-spattered clothing. The neighbor retrieved a firearm and confronted the interlopers. They were held at gunpoint until police arrived. The teens had run away from a juvenile rehabilitation camp just two days before. They had broken into the cabin and brutally murdered the elderly couple staying there before the armed citizen was able to stop them. -The Kansas City Star, Springfield, MO

A man in his early 30s entered Armen’s House of Music one afternoon, looked around and left. He returned just a few minutes later with a wooden club and began attacking the owner’s wife, Sylvia Armen, who was working in the store at the time. The owner, Alfred Armen, heard the commotion and ran to his wife’s aid. He tried to defend his wife and fought with the suspect before shooting him to death. -WTAE.com, Bethel Park, PA

After confronting a man lurking in his front yard the previous morning, Clint Lowery called police a second time when the same man tried to gain entry by forcing open the door to his home. With his 2-year-old daughter sleeping inside, Lowery did what he had to do to ensure his family’s safety. Lowery met the intruder on the front porch with a 12-ga. shotgun and held him there until police arrived. -Peninsula Daily News, Port Angeles, WA

A pregnant Texas woman was home alone when she heard someone banging loudly on her front door. She didn’t answer the door. While the first suspect was banging on the front door a second was breaking in through the back door. The woman grabbed her husband’s .40 S&W handgun and called 911. When the intruders saw she was armed they fled to their car. -Gunssavelives.net, Palmview, TX

Richard Duffy, 48, and his son were watching TV when an intruder broke down their front door. After a brief altercation the intruder was fatally shot, according to a spokesman for the Maine Department of Public Safety. Another man waited in a car, but fled after he heard the gunshots. -TheBlaze.com, Rome, ME

At approximately 11 p.m., a resident responded to the sound of an intruder entering his home. A 21-year-old man had used a shovel to break through a back window and enter the residence. The resident retrieved a firearm and shot down a hallway toward the intruder. The intruder, who already had a long list of previous offenses, was struck and later pronounced dead. The homeowner was reportedly not injured during the home invasion. -The Post & Courier, Orangeburg, S.C.

A 56-year-old man heard the doorbell ringing at his home just before 1 p.m. When the homeowner failed to recognize the man outside his door, he ignored it. A few moments later, the suspect threw an object through a glass front door and entered the home. The homeowner responded to the sound and the two men struggled. The homeowner pulled out his handgun and fired twice, striking the intruder in the shoulder. A delivery truck driver saw the scuffle from outside, heard the shots and made the initial 9-1-1 call. The intruder was arrested after receiving medical treatment. -The Issaquah Press, Issaquah, WA

Four teens on a crime spree forced their way into the home of 72-year-old Morris Reaves. Two of the teens wore ski masks and one wielded a rifle. Reaves heard the break-in take place and met the youths with his own firearm. Reaves fired two shots at the intruders causing them to flee to a nearby car and drive away. The four suspects were later identified from images taken by Reaves’ security camera. They were each arrested and charged with one felony count of kidnapping, robbery with a dangerous weapon, conspiracy to commit burglary, breaking and entering a motor vehicle, larceny after breaking and entering, and misdemeanor assault by pointing a gun. The Charlotte Observer, Lenoir, NC

In the main-stream media, when we hear about firearms, they are always in a bad context. The media seemingly salivates over reporting horrible tragedies when there is a gun involved because it helps them to demonize the gun rather than the psychopath that fired the gun. I hope that the personal accounts listed above will shed some light on the beneficial uses of a firearm.

Consider this… Some of you may be living in a bubble whereby you may feel that you do not need to protect yourself with a firearm — because you have never had an experience with a dangerous threat and you do not expect one. You will simply dial 9-1-1 if you ever need to. Here’s the thing…

When you are jerked awake at 2 a.m. by glass shattering of the window breaking (or door being kicked in) while a burglar enters your home… will the police get to your bedside before the burglar might? – Modern Survival Blog


4 Unconventional Shooting Positions You Must Practice

$
0
0

unconventional shooting

By Adam C

I was talking to a veteran police officer the other day, a tough street cop in one of the largest police departments in the country.

Over the course of his 26-year career, this officer had gotten himself into no less than three shootings, all three of which resulted in the death of a bad guy. The interesting part wasn’t so much the shootings, but the position used in each shooting that is definitely cause for further examination: one shooting was from a seated position inside the officer’s cruiser, another, on the officer’s side while lying on the ground crouched behind his tire; the last, standing in a proper weaver stance.

What’s interesting about this scenario is that only one out of three shooting positions was from a conventional, upright stance. This should definitely be a concern for the concealed carry enthusiast who has it in his or her head that when a threat presents itself, they are going to stand up, break into that perfect weaver or isosceles stance, and fire at the bad guy just as if they are at the range.

It’s no secret that the vast majority of gun owners train with range safety rules in mind. In and of itself, there is nothing wrong with range safety, but you need to consider that when your time comes to draw that weapon in self defense, you most likely won’t be doing so from behind a bright red line, or with convenient partitions on either side of you or even range commands coming from the speakers. You’ll shoot from wherever you happen to be, whether that means sitting down to dinner in a restaurant, over your sleeping spouse in bed, or from the driver’s seat of your car. All of these positions aren’t exactly easily practiced at most ranges, so you’ll need to think outside the box in doing so.

How To Defend Yourself And Your Family Against The New Breed Of Lowlife Criminal Scum

Sure, the great bulk of your training can be accomplished using conventional shooting positions; after all, that’s how you learn the fundamentals of breathing control, sight picture, sight alignment, and trigger squeeze. Once you have become a master of the basics, however, consider shooting from some new positions. Keep in mind: You may need to switch shooting locations in order to do some of these, since most ranges will frown upon them. Find a piece of Bureau of Land Management (BLM) land to practice on, or some similar locale. Try these:

1. Prone: An oft-taught position in the military, prone shooting is accomplished by lying upon your stomach and facing the target, arms extended, weapon in hand. Prone shooting is inherently safe and is often used to teach neophytes the basics of rifle shooting because the likelihood that the new shooter can flag people beside him with his weapon is fairly low. Still, prone shooting works great for pistols as well – your elbows touch the ground, giving you good support and making your shooting more accurate than it would be when standing upright. Finally, you present a low silhouette and very little target area to a threat while in the prone position.

2. Supine: Lying on your back and shooting through your open knees isn’t a position we would choose as the best for marksmanship, but sometimes, supine shooting is a necessity. Supine shooting is one of those positions you might just happen to fall into when reacting to a threat; you might dive back out of your restaurant booth or push out of the driver’s seat of your car, landing on your back. It’s not the best position, but it does happen and is a position that’s easily practiced. Lie on your back, knees spread apart and head elevated as if you were doing a crunch. The pistol will not usually extend past your knees, which means you need to take extra care to not shoot your kneecaps off when tracking a target. Practice at half speed at first.

3. On your side: Usually accomplished behind a barricade of some sort, lying on your side can present a very small target since normally only your gun hand and a piece of your face is exposed, with the rest covered by a barricade. Again, lying on your side happens to be a position you might fall into when reacting to a threat; it’s not a position you would normally choose. Practice shooting with both hands and lying on both sides to become proficient at it. Some pointers to keep in mind are keeping the pistol sufficiently far off the ground to prevent the slide from snagging anything, and being careful of not placing the ejection port too close to the ground to prevent jamming or stovepipes.

4. From a car: There is no reason why you can’t practice shooting while belted into your car, from both the driver window and passenger window. On some pieces of BLM land, this is really easy; just set up your target and fire away. Realize that in a real gun battle, you might have to shoot through a door or window as well, but for now, using the open windows, just shoot – safely, of course. Hearing protection is paramount when practicing this type of shooting; you most likely won’t have it in real life, but for now, wear it and even double up.

By practicing shooting from unconventional positions, you could inadvertently save your own life or the life of a loved one. Not every shooting happens in a clear, well-lit range environment – as a matter of fact, the vast majority of shootings do not happen in such places at all. How you practice shooting could spell the difference between success – and defeat. - Off The Grid News


How to weatherproof your firearms

$
0
0

By Road Warrior

Here in the Northeast U.S., deer hunting season is upon us. In my family, that means getting gear ready for said hunting season. With us, WHAT we hunt with is as much a part of the hunt as scouting, planning, and getting out there. We’ll sit around and jaw about what we’re taking, why, new loads we’ve handloaded for the rifles, how they perform, trajectories, bullet designs, blah blah blah. It’s part of the tradition, and I look forward to it all year. However, once we’ve settled that, we get them ready for the season, and any inclement weather the firearms may have to be carried through. Since we all work through the week and Maine doesn’t allow hunting on Sundays, it generally means we only get out hunting 4 Saturdays during the month-long season, so we’re getting out, weather be damned!!

But what we do to our gear translates over nicely to how to set gear up and protect it for a SHTF emergency. Your gear has got to be ready to rumble, and can’t be bound up by corrosion brought on by summer humidity, winter snow, or dirt, driving rain.

What your gear will face

You know your area better than I do, so you’ll have to do your own figuring what will work best for your individual scenarios. If you live someplace in or near the Mojave desert, say in the Las Vegas area, dust, and dirt may be your biggest issues. In Florida, salt spray in the air and rampant humidity will be your enemies, and for us here in the northern US, we get the fun of crazy, unpredictable weather: snow, driving rain, humidity, extreme temperature variations. Each type of meteorological conditions will effect your firearms in different ways, and should be counter-acted accordingly. Even if the gun never leaves the house, moisture in the air and fingerprint/hand oils will attack your rifle just as readily as leaving it in the rain. So let’s square your gear away, shall we?

Rain/snow/humidity

Rain and snow can be a real bitch to guns. Water can and will run down and penetrate to every unseen surface of the gun, causing massive rust on metal and swelling and rotting wood (if your stocks are made of wood.) While gun oils will do a very decent job of repelling moisture, it often will then go where the oils aren’t and do its worst. So I prefer to mitigate that as much as possible with grease, applied thoroughly to areas that don’t get wiped down or dried when the gun comes back in from the weather.

I swear by R.I.G. (Rust Inhibiting Grease) as my grease of choice for hunting guns and anything that gets long-term storage. It goes a long way, and lasts forever, much like the cosmoline the military used to use for long-term storage. It’s cheap, and has worked well for years and years. If it ain’t broke, don’t fix it, right? There are more modern lubes and bio-lubes like FrogLube that do work very well, too, but they need to be heat-applied to get into the pores of the metal, and don’t work that well on wood. Grease goes well with most everything.

I break the guns down to a very basic level – I remove the stocks and magazine floorplates/triggerguards. I then liberally smear grease to the barrel/receiver channel in the stock, and I really try to push it into the pores of the wood so water won’t penetrate into it. Then the metal gets a light, but complete, covering of grease anywhere it’s hidden inside the stock. A tip: you will probably need to slightly re-adjust the sights of a rifle that has been pulled out of its stock, as the stock bedding is a key part of how a rifle shoots.

Grease on the inside of stock and on metal works in an 1895 Winchester.

Grease on the inside of stock and on metal works in an 1895 Winchester.

Grease applied inside the stock, and all internal metal parts on Winchester Model 54.

Grease applied inside the stock, and all internal metal parts on Winchester Model 54.

My thought is, anywhere I can’t get with an oily cloth after I come in from the weather should get greased up, so I don’t need to worry about it. I do NOT grease the bore unless it is going away for long-term storage. A very light coat of a high-quality gun oil (I like Hoppes Elite) goes on the bore, and on all exterior metal parts before the gun goes out to play and after I get back, to keep water out of the metal.

The upside to grease is no corrosion or rot; the downside is that in extremely cold temperatures, grease thickens substantially and will slow down moving components of the gun, such as hammers, springs, and firing pin travel, and could render your gun useless. If I know the temps will be dropping below freezing, I’ll break the gun down and limit the grease to non-moving parts, and the moving parts will get a dry graphite lube like Remington DriLube. I like my guns to go “Bang” when I pull the trigger.

Also, I don’t use grease on guns that will be used for extended firing sessions, such as high-capacity semi-autos. The grease will melt and either burn off or fly off/drip out from the gun once it really heats up, so I limit it to my hunting bolt, pump, and lever actions. For the high-heat guns, the aforementioned FrogLube, or Militec-1 is simply awesome: degrease the gun thoroughly, and use a heat gun or your oven to heat the works up to almost-too-hot-to-touch temps. Use a toothbrush to smear in the lube. Once every surface is covered, let the gun cool and wipe off any excesses. What happens is that when you heat the metal of the firearm, the pores of the metal open up. After you introduce the lube, the metal cools, trapping it inside the metal pores, where it will be released as the gun heats up, keeping the gun water-repellent and running slick.

And, for the opposite end, I keep a wrap of electrical tape over the bore of the rifle. This keeps moisture out, and when you pull the trigger, air and gases escaping past the bullet will blast through the tape before the bullet touches it, so you point of impact will not be harmed. Be sure to obtain scope covers for any optics, to keep water off the lenses.

Sand/grit/dust

The opposite extremes can be just as damaging. Being in a sandy, dusty environment like the Middle East will bog guns up just as fast as water. Dust and dirt will collect anywhere there is oil or grease, and then stay there. Eventually, this muddy, gritty works will keep your gun from functioning. Also, dirt in the bore can be catastrophic when you send a bullet under high pressures down it.

Luckily, if your conditions are dry and dusty, you don’t need to worry about rust as much as keeping the crud from building up. Here, we almost treat the gun like it’s going into very cold temps: use grease if you’d like on non-moving parts to keep dust and stuff from getting under and into your gun, and then a dry lube on any moving parts. I hear Froglube works well if you really be sure to wipe off excesses. I know that I’ve heard horror stories of troops in the middle east having their guns jammed up by crud that’s accumulated and attracted to the CLP they use. So just know what CAN lead up to your gun being disabled by dust and sand, and be prepared to dig out the toothbrush and keep things cleaned out more often. The tape over the bore will keep junk out in this instance too.

In case you can’t tell, I don’t really have any experience with overly dry conditions here, so I’m going on what research I’ve done and stories from guys deployed in situations like those. If you have any experience in those climates or other extremes, please speak up as to what works well for you so others can benefit from your experience as well. Much obliged!  – SHTFBlog.com

Stay safe! -TRW


The 3 Best Every Day Carry Items For a Crisis

$
0
0

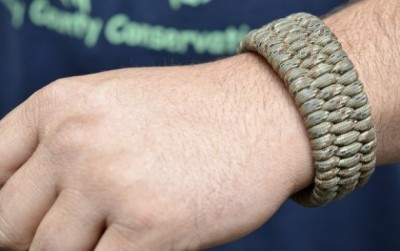
paracord bracelet

By Pat B

In prepping, we tend to put a lot of thought into big picture planning. We gather food supplies, medical supplies, fuel and water. We carefully rat hole these items at our chosen refuge, and continue storing, maintaining and rotating our stockpiles. We even consider the event that we may have to leave this refuge at some point, and assemble bug-out bags (BOBs) and off-premises caches for this contingency.

Many of us plan on the possibility that we may not be home when the balloon goes up, and we either keep our BOB in the car or assemble get-home kits for the stated purpose. But crises are a fickle lot, and the odds that they will be cooperative in their timing and have us handy to our gear when they take place are not particularly in our favor. Add this to the fact that there are a wide range of smaller catastrophes that can take place at any time and it becomes clear that keeping some amount of survival and emergency gear on our person at all times is not the worst idea we could have.

Unless you are in a position to carry your BOB on your back at all times, you should give some thought as to what you load your pockets or purse with each morning before you leave the house. Every Day Carry (EDC) items should be calculated to give you a survival edge and help meet basic needs if you are cut off from everything except what you have on your person at any given moment.

The backbone of my EDC gear is what I have come to think of as my “Caveman Kit”. This is a small selection of gear that can accomplish the three basic skills that have been helping humans to survive for untold millennia. These skills are cutting, tying and burning. With these skills covered, you can start a fire for warmth, you can cook, and you can make water safe to drink. You can improvise shelter, catch fish and small game, fix a broken shoe lace or pack strap, or create weapons to defend yourself. With these skills, and a well-stocked cranial survival kit (chock full of knowledge), you can improve your odds in almost any circumstance.

1. Burning. Where burning is concerned, most experts will agree that it is a good idea to have at least two means of starting a fire with you at all times. I always keep a disposable butane lighter with me; these are a very inexpensive piece of equipment, and serve well until conditions get too wet or windy. As a backup, I keep either a blast match or other ferrocerium fire steel. These fire starters will throw HOT sparks in any conditions, and coupled with good tinder will get your fire going in no time. It is a good idea to have a couple cubes of wet fire, a trioxane fuel tab, or even a small bag of dryer lint with you to serve as tinder. If you opt for matches, make sure they are waterproof and strike anywhere; hurricane matches are as good as it gets. Practice making fire; it isn’t always as easy as you think, and fire steels in particular require practice. Fire building techniques are a must in the cranial tool box.

The pack for anybody who wants to be fully prepared for an unexpected emergency

2. Tying. For tying, you should keep a length of cordage with you. Paracord bracelets are a very convenient way to have 6-10 feet of 550 paracord with you at all times. I wear mine 24/7, even when I step into my pleated slacks and button down shirt to venture into the community college where I teach part-time. These bracelets go with just about any attire without looking conspicuously out of place, and paracord is truly the duct tape of string. I have used paracord to replace a broken boot lace, to fix a duffle bag strap that broke while I was rushing through an airport, and to fix the handle on a plastic pumpkin that broke on a trick-or-treat mission with my kids. In more extreme times, paracord can be used to make a tent out of a tarp, to catch a fish, or to lash together just about anything that needs lashing. Your ingenuity is the only limit with this stuff, and a good set of knots should be stored away in your knowledge base.

3. Cutting. I don’t even know where to start with cutting. To say that there are a million and one uses for a good blade is probably an understatement. I won’t even go into them because if you can’t think of at least a hundred in 30 seconds or less you should probably give up prepping! I tend to carry a pocket knife, and lean towards trappers or stockmen. These styles have been around a long time for a reason, they are terribly versatile. In addition to my pocket knife, I like to keep a larger fixed blade or folder on my belt. Even in professional attire, I don’t think that a three inch lock blade in a plain sheath is too out of place. When I am dressed more casually a medium sized, full tang (I am not a fan of hollow handled “survival knives”; I find them to be too weak) bush craft style knife seldom draws comment. Lately, I have become fond of karambits, as they are strong, functional and an incredibly effective cutting and slashing weapon. Aside from the utilitarian functions, never underestimate the defensive capabilities of your knife. When circumstances prevent me from carrying my handgun, you can bet I have a decent blade with me. Devote time to learning and practicing defensive blade work, and file these skills away in your cranial tool kit.

These items form the basics of a very effective survival kit, and rank even higher than a certain credit card on the “don’t leave home without it” scale. From here, you can add gear to suit your tastes, needs and pocket size. I feel that a Leatherman tool is a good addition, and keep one on my belt at all times. The trusty old P38 can opener is right at home on your key ring, and a handcuff key can live there too (just saying…). If you are permitted, a concealed handgun is also a very good idea. The pocket that doesn’t hold your wallet can hold a space blanket and/or an emergency poncho; these two items can be used to create effective shelter and body heat maintenance when combined with your paracord. A small flashlight fits easily in a pocket and could be invaluable if you are caught out after dark.

In addition to your gear you should always dress for your season and climate, even if you are planning on spending most of your time indoors. Always wear the sturdiest and most comfortable shoes that your dress code permits; your Italian loafers may look great but you wouldn’t want to walk 15 miles in them. You probably won’t be able to carry it at all times but keep a water bottle or two (at least one with a filter) close by, in your car or desk, along with a few thousand calories worth of rations (protein bars, jerky, trail mix, things of that nature).

Preparedness is a full-time occupation. With a little forethought you can load your pockets with the basics, without loading them down. Most importantly, never forget that your most important survival tool rides under your hat. Make sure it is full at all times. – Off The Grid News


Survival Tactics: Concealment Vs. Cover

$
0
0

Taking_Cover_Final

By Josh

If there is one area where Hollywood does a major disservice to self-defense, it is in the way it shows a firefight. Any material the hero or major villains decide to hide behind becomes invulnerable to bullets, whether it is a table, a car, or a wall in their home. The proper distinction between cover and concealment is lost on the part of the scriptwriters and action choreographers, and unfortunately as a result many preppers who watch their movies have some misconceptions too! If you were put in a position where you had to defend your home, food, and family from looters you wouldn’t want to rely on faulty TV tactics, so it is important to understand the real differences between cover and concealment.

What is the difference?

Concealment only hides you from the enemy. It doesn't protect you from gunfire if they do spot you.

Concealment only hides you from the enemy. It doesn’t protect you from gunfire if they do spot you.

The names can give you some clue. Concealment is primarily able to hide you from prying eyes, keeping you from being specifically targeted in a firefight. However, if you tried to use concealment to protect yourself from stray rounds, you would turn into a lead depository pretty quickly. Cover, on the other hand is sufficient to protect you from enemy rounds winging their way towards you. It might also conceal you, but generally that benefit is secondary to the bullet protection offered. Furthermore, different kinds of cover protect from different levels of damage. A small caliber pistol round that hits you from a long range requires far weaker cover than a rifle round from point-blank range will.

The other key difference, and the one that most people tend to forget, is in how common they are. Concealment is almost constantly available in varying degrees, as every wall, piece of furniture, and tree could potentially hide you from the enemy. Obviously some means of concealment (such as a carefully designed ghillie suit) are better than others, but on the whole concealment is almost always at hand.

Cover protects you from bullets, and can also double as concealment in many cases.

Cover protects you from bullets, and can also double as concealment in many cases.

Cover by contrast is rather rare in most settings. Most furniture, walls, cars and smaller trees are not sufficient cover for even small caliber rounds, and so diving behind them in a firefight would serve only to conceal your position rather than protecting it. To be very clear, this includes metal tables and even small vehicle engines depending on the round despite what a thousand TV shows and movies may have shown you.

In most homes, cover is almost nonexistent unless there are concrete walls in a basement or a steel door to hide behind. Outside, unless you live in a city or town which has buildings with thick concrete/brick walls or other solid structures, your best bet will be to prepare earthen defenses like a foxhole, preferably surrounded by sandbags as additional protection.

Common types of concealment and cover that you’re likely to come across in a disaster

In order to further help you to tell the difference between these two concepts, here is are lists of the common kinds of concealment and cover that you’re likely to come across. If you’re having trouble shaking off the preconceived notions that endless TV firefights have given you, these may prove particularly helpful. Note that many items that qualify as cover also function as concealment, but for clarity the items on the concealment list only hide, not protect.

Concealment

  • Tree limbs, leaves etc.
  • Bushes and brush, including tall grass.
  • Shadows and blinding light (if positioned so that the enemy has to stare into a floodlight or the sun in order to look at you).
  • Opaque curtains.
  • Drywall, wood, and other thin material walls.
  • Piled clothes, blankets, leaves, and other materials.
  • Small (under 2ft in diameter) trees.
  • Vehicles, excepting reinforced doors on squadcars and particularly large engine blocks.
  • Tables, desks, doors (excepting thick steel doors).
  • Ghillie Suit.
  • Window blinds and shutters.
  • Smoke
  • A corpse (even a particularly fat person will not stop most rounds)

Cover

  • Thick stone, brick, or concrete walls/buildings.
  • Large engine blocks.
  • Thick (over 2ft in diameter) trees and stumps.
  • Natural valleys, hills, holes, and craters from explosions.
  • Earthwork defenses, including several rows of sandbags.
  • A safe.
  • A steel door.
  • Piled rubble.
  • Concrete walls in a basement.
  • A freezer or refrigerator, assuming it is packed with food.

Make sure you know the difference between cover and concealment: it might just save your life in an emergency. – Prepared For That

Your Thoughts?

Let us know what you think in the comments below. Can you think of any other common types of cover or concealment?


Surviving An Economic Collapse What Are Your Options

$
0
0

By

In the case of an economic collapse your life will be turned upside down. The paper that your money is printed on will be just that, paper. If you have done a good job prepping, most of your possessions will be more valuable that any printed money, and even gold.

Drinkable water, food and supplies you have prepped would become the new gold. But having these supplies is one thing, keeping these supplies is an entirely different problem. Preparing and protecting the things you have stockpiled are crucial to your survival, no matter what situation you find yourself in.

What Are Your Options

  • Do you live in a rural setting?
  • Do you live in an urban setting?
  • Do you live In a suburban setting?

An Urban Crisis

Coping with an economic collapse in an Urban setting will require fast action and survival skills, just because you live in the big city does not mean you won’t be able to utilize wilderness and military survival skills. Things you will have to think about are…

What will you do when someone tries to force their way into your home? You will not be able to hide under the bed and hope they leave, so you better have a gun, and you better be prepared to use it. Sometimes just the sound of a shell being chambered in a shotgun will run them off…but don’t count on it.

What if you find yourself in the middle of a mob of rioters? In this situation you will need to know where your safest escape route is. You could be out looking for water or supplies, and as you turn the corner “HOLY S#IT!” There are a thousand people moving in your direction. If finding an exit point is not an option you will need to stay as far away from the “action” as possible, a mob bent on looting and destruction will not pay much attention to you, unless it’s you they are after, in this case you better think harder about that exit you were looking for.

Are you being watched? The government might not be watching you anymore, but someone else might be. Always be aware of your surroundings, especially in open spaces. If you think someone is following you, walk erratically and change directions. If they are still following you will need to either stop and “solve” the problem or find an escape route. And remember, sometimes fleeing is your best option.

Plan on eventually being evicted. As everything becomes worse it will be continually harder to protect yourself and your family. Violence, gangs and criminals will be everywhere and when word gets out that you are prepared, you won’t be dealing with just one or two people anymore. Always have a plan B, and always have an escape route.

Home Security And Preps Security. Not only will civilians be after your preps, but the government will be too. The government could very well decide that it is illegal to possess more than a weeks worth of food and water and try to confiscate your supplies. Always find places to hide your food and supplies from looters and who ever feels like you need to share the wealth. Just because you had the foresight to prepare for an event like this doesn’t make you liable for the ones who didn’t.

A Suburban Crisis

An economic collapse in a suburban setting will be a little different than an urban setting because you might have a little, very little more time to react before the chaos reaches you. If you live a few miles outside of a heavily populated area you could have a few more options available to you. Just keep in mind that you are not far enough away from the population to reach if they want to.

With everyone wanting to get out of dodge as quickly as they can, you become a big target. The inner city’s will be completely looted and destroyed and that means you are next. Just like animals in the wild, when the food source is gone the herd moves to greener pastures…your front yard.

Know your surroundings and your neighbors. Where you live will determine how you secure your perimeter. You could use surveillance cameras and motion sensors, but if you have no power you have no perimeter. You can build traps on other deterrents on your property, just make sure your family knows where they are. I wouldn’t suggest making booby traps on your property until you actually need them because you are risking injury and liability if anyone were to spring it.

Like they say, there is safety in numbers. Having a network of people that will help each other will give you an advantage if a group of starving zombies decides they want what you have. Try to be a valuable resource, someone who can contribute and is not a liability. Be aware though, that your neighbors that are fighting by your side could turn on you if it means their survival.

What to do when the crazy masses come to visit? In a suburban area you will have a few more options available when it comes to using your surroundings as a benefit against attacks. Get to know your neighborhood and surrounding areas well, play out different scenarios about what you would do if something were to happen.Always have a plan and always plan to adjust.

Have a plan B and C. In a suburban setting you will be able to escape a situation easier than in an urban setting, as long as you are aware and have a plan. Timing will be critical because things can happen quick. You will not have time to pack the family truckster if the mob is down the street. have an bug out plan, and just like a fire drill, practice it. There is less chance your family will “freak out” if they have some idea what to do.

Self defense. Regardless of whether you are in the line of fire or not you can count on one thing, you will get visitors sooner or later. Whether you live in the city or you live in the suburbs self defense will and should be a top priority. Make sure you are not only comfortable with your gun, but are mentally ready to use it when you need to.

Bugging in or bugging out? Depending on your surroundings you might be able to last a while staying put. It all depends on where the herd of desperate people are moving. If you live behind a Walmart, I would get the hell out of there, if you have to drive 30 minuets to get to a store your chances are a little better.

A Rural Crisis

A rural setting is the most desirable option when it comes to surviving an economic collapse. Unfortunately this is not possible for most of us. Having a community or a clan is going to be a huge asset for you in a rural setting. Hopefully you will have time to form a bond with your neighbors before hand, although I would still be cautious about this. Try to be someone who adds value to the community, your less likely to be cast out if you have a valuable skill. Keep in mind that you never know what even the most honest and compassionate person will do when facing life or death…this includes us.

More available options. Because you live in a rural area you will have more options when it comes to things like building an underground bunker or reinforce your perimeter. A house in the city would usually not have the property available to build a bunker and it would stick out like a sore thumb if it was highly fortified. whereas in a rural setting you have a little more anonymity and your neighbors will probably just think you are some crazy old coots…let em.

Your Primary food source should not be Safeway. In a rural setting you have far more access to mother natures food sources and have the ability to farm, trap and hunt wild animals, rather than the squirrel’s that live in city park. Almost everyone living in a rural area will have room to have chickens, goats or an area for gardening.

You will have valuable time to prepare. I don’t just mean time to prepare your property and family, I mean time to prepare a survival strategy with your neighbors as well as find out which of those neighbors will be a liability to you and your family. A strong community that works together can withstand much more than any single person. You might even become that liability if you decide to go it alone.

Self defense in a rural home. Even though the laws are the same all over the country and state by state, you can own 10 guns if you live in the country and no one bats an eye. If you were to own 10 guns in the city someone would inevitably turn you in because they thought you were going to go on a mass murder spree. It’s not fair, but it’s reality. This is probably because everyone else that lives in a rural area is a gun owner as well…good for you!

This doesn’t cover every aspect of survival in the event of an economic collapse, but its a good starting point to build on. Make sure and educate yourself as much as you can, and always take into account your living situation while prepare yourself for an event like this.

What will you do? Are you willing to take on the challenge of bugging in and defending your property? Or are you going to bug out and take the risk of being out in the open? Whatever you decide you should always have a plan for both. – Survivalist Prepper


Which to Choose: Survival Knife Vs. Survival Axe

$
0
0

Axe_and_knife

By

Preppers are ever and always debating which tool or tools are best for various situations, and the arguments surrounding survival knives and axes are no exception. Although each tool has their finer points and uses that the other doesn’t match making them an excellent matched pair of tools, when the time comes you may need to select one or the other for your pack or stockpile. In that case, which one should be included? We’re going to look at the strengths and weaknesses of each tool, both knife and axe, to determine which will be most useful for you.

What is a “Survival” knife or axe?

Although there are plenty of fine knives and axes available on the market, only a small subset of them are truly suitable to be called “survival” axes or knives. Generally speaking, a true survival tool has these qualities:

A small hatchet like this is much easier to carry than a big splitting maul.

  • Able to be carried long distances. A big splitting maul may technically qualify as an axe, but it is hardly a survival tool since it is much too heavy! This criteria is generally applied only to axes, since even heavy knives are plenty light for a person to carry. The best kinds of axes tend to resemble hatchets, being small enough for easy packing and light weight yet still substantial enough to take serious punishment.
  • Durable. This is where many knives tend to fail. Although there are definitely uses for cheap pocket knives and the like in emergency situations, a true survival knife needs to be made of sterner stuff. Although axes will generally do better when subjected to a durability test, there is still a need to cull the cheap big box store brands made with low-quality steel. Both knives and axes need to be able to handle chopping wood, sharpening stakes, potential self-defense against people and animals, and the occasional accidental strike against rocks or soil over a long period of time.You need knife and axe blades made of metal which is worth sharpening after hard use.
  • Able to be repaired/sharpened. The axe or knife needs steel of sufficient quality to be sharpened properly over the course of time. Ideally, a good survive knife blade or axehead will have a removable grips/handle in case they become damaged over time.
  • Versatile in function. Some knives are designed primarily for combat or other uses and have special features that allow them to do this job better. Likewise, there are many axes designed primarily for carpentry work or only for splitting big thick logs. A survival tool needs to be a jack of all trades, not specifically good at any one thing but decent at a wide variety of common tasks. Lopping off limbs for a lean-to, skinning small game, splitting small logs, cutting through ice, and cutting notches for traps and snares are but a few of the many jobs your survival axe or knife will need to perform.

The strengths and weaknesses of survival knives

A serrated edge can be useful in certain situations, giving knifes a unique advantage over axes.

On the other hand, a survival knife’s performance can suffer when it comes to the larger jobs. If you should need to split small logs or lop limbs off of trees, you may find that although the knife can do the job it’s not nearly as easy as it would be with an axe. A particular area of weakness is in cutting limbs of the proper size for a shelter. Unless you have softer wood to craft into poles, you may find it difficult to get clean cuts through the limbs that are ideal for lean-to poles. Knives are also more difficult to keep properly sharpened in some cases, although with practice this issue is significantly diminished.

The pros and cons of a survival axe

Using an axe, you'll have a much easier time cutting through logs and limbs.

However, axes do have some weaknesses to put against their strengths. For one thing, almost any axe is going to be larger and heavier than a survival knife and will reduce the overall amount of supplies you can carry. Furthermore, they’re also more awkward to use when trying to make delicate or tiny cuts such as those needed for cleaning an animal or preparing snares. They also lack additional features like serrated edges or a convenient folding action that covers the blade, meaning that they’re more limited in many ways. Furthermore, they’re also more dangerous to use as a single slipup can result in a deep and deadly wound to an arm or leg.

So, which to use?

The truth is, both have their uses depending on your situation. If you need to carry a lot of other heavy gear, a knife would probably suit you better than a weighty axe. If you are going into damp places where you’ll have to cut dry limbs off of trees instead of harvesting dry wood on the ground, an axe will make your work go faster. If you’ll be cutting ropes for snares and skinning the game you catch, a knife will make the work simpler than a big axeblade. It comes down to what you personally need: the smaller, lighter finesse of a survival knife or the thicker, heavier, blunt work of the survival axe. Choose wisely! – Prepared For That

Your thoughts?

Which suits you better? Would you carry both if you had the choice? Let us know in the comments!


How To Make A Ghillie Suit

$
0
0

How To Make A Ghillie Suit

By P. Henry

A ghillie suit is something I have been meaning to buy forever. When it comes to camouflage for hunting or sneaking up on people, there isn’t much better if you are using this the right way, but I never pulled the trigger so to speak on any of the pre-made varieties I have come across. I was watching Doomsday Preppers last night and one of the small nuggets of usefulness I was able to pull out of last nights show was how to make a ghillie suit yourself. The steps below are fairly easy and we even found a video that shows you everything you need. If you don’t want to do this yourself though and still prefer to buy a ghillie suit already assembled, you can do that instead and get into the woods faster. Either way, a ghillie suit is a great addition to your prepping supplies if staying hidden is important.

Commercial two-dimensional camouflage is great for blending into a variety of backgrounds, but it does nothing to offset your most game-spooking signature: your silhouette. Veteran hiders—military snipers, undercover surveillants, and hard-core hunters among them—rely on 3-D camouflage, entire suits made of billowy material that blurs their outline and allows them to disappear in plain sight. These suits are derived from those created by early Scottish game keepers, called ghillies. Make your own in one day with an old jacket, burlap, netting, dental floss, sewing needles, and glue.

Materials you will need:

  1. Used set of Camoflauge BDU’s
  2. Jute or burlap strips
  3. Netting
  4. Shoe Gloo or Zip Ties

Step 1 – Add the Netting

The perfect base is a used BDU uniform jacket, available at military surplus stores. Buy a roll of replacement fishing net and cut it into strips at least two squares wide. Using dental floss, sew these strips down the sleeves and the front of the jacket, leaving 6 to 8 inches between strips. Then seal the stitches with shoe glue.

Add the netting

Step 2 – Ready the Burlap

A traditional ghillie suit is covered by strands of burlap. You can get material from bulk coffee bags, but any burlap bag or roll of netting will work. You need between 4 and 8 pounds of material for each suit. If you can’t find burlap, buy braided jute twine in natural colors and separate each braid into individual fibers.


Ready the Burlap

Step 3 – Separate the Strands

Unraveling the burlap or jute material into individual strands is the most time-­consuming part of making the suit. Cut strips of burlap and then unravel the cross-linked fibers and separate them into strands of equal length. The longer strands will go on the sleeves and the front of the suit. Shorter strands will overlap down the back.


Separate the strands

Step 4 – Tie in the Burlap

Now you’re ready to tie the strands of burlap or jute into the netting. Take 10 to 15 strands and fold the bunch in half, then push the loop under each vertical square of netting. Draw the hanging ends of the bunch through the loop and pull tight. Start at the bottom and work upward, ensuring that each row overlaps the one beneath it.


Tie In the burlap

There are also a ton of videos on YouTube about how to make a ghilli suit and this one is pretty basic, but shows the steps nicely and you get to enjoy a rocking song to go with it. - The Prepper Journal

Read the original post on Outdoor Life


The Complete Guide to Batoning

$
0
0

The Complete Guide to Batoning

By Guest Contributor

This article acts as a comprehensive guide to batoning. Be sure to pay close attention to the last two sections (the one on proper batoning technique, and the one on troubleshooting the difficulties of batoning), as these two sections will help you most out in the field.

What is Batoning?

Batoning is a survival and bushcraft technique whereby a sturdy knife is lodged in a piece of wood then struck repeatedly by a baton-like object, a heavy piece of wood for instance, in order to split the wood.

knife-batoningOntario SP10 Marine Raider Bowie - Amazon

Purpose

Among other purposes, batoning is often used to split logs and other wood to create kindling, to create access to the dry inner portion of a wet log for generating dry tinder, and to produce shingles, slats, or boards.

Advantages of Batoning

In many instances, batoning makes the process of splitting wood far easier than it’s alternative, chopping wood. Batoning requires less effort, takes less time, and results in a much cleaner cut than chopping. Batoning also requires much less experience to master than chopping, as aiming while chopping may be difficult to do at first. Batoning is an extremely handy technique to know when you do not have a chopper lying around, as may be the case if you’ve forgotten to take a chopper camping, for instance.

Disadvantages of Batoning

Under certain conditions, such as in the case of batoning wet logs, batoning can be somewhat difficult. Batoning can also sometimes damage or even break the tool being struck. Thus, some caution must be taken when batoning. To reduce difficulties and knife breakage, proper batoning technique should be used (see the section below on proper batoning technique).

Why Knives Break When Batoning

In most cases, knives break when batoning because they are being batoned at an angle. If they are placed and batoned straight, the knife is far less likely to break. Batoning with the wrong baton (like a rock or brick for instance) will obviously also cause damage to the knife, which is why wood should really be the only thing used as a baton when batoning. If proper batoning technique is used, however, this can all be avoided, or at least mitigated dramatically.

survival knife for batoningBoker Plus Vox Rold Knife - Amazon

Ideal Baton

A piece of wood is the best tool to use for a baton. Rocks, bricks, and other extremely hard objects will work, but they will severely damage the spine of the knife you are using to baton. The best piece of wood to use is a piece of hardwood. If you would like to make a more comfortable batoning tool, say if you’re going to be batoning a lot of wood, shape your piece of wood to look something like a short baseball bat: debark it, and thin out a handle, then shave it down until it is smooth to the grip. The goal is to make a batoning tool with a wider hitting surface, and a thinner handle surface.

Ideal Batoning Knife

Batoning can be done with nearly any fixed blade knife, so long as the blade is strong enough to be able to stand repeated batoning. Knives with full tangs (where the metal from the knife extends past the blade and through the entire handle) are stronger and because of that will work better for batoning, as they are less likely to be damaged or break. The size of the ideal batoning knife depends on the width of the piece of wood you are attempting to go through. The edge of the blade of the batoning knife should be approximately 2-3 inches longer than the diameter of the wood you are trying to baton. That being said, if you’re looking for a single versatile batoning knife to use, you may want to stick to a longer blade. It is obviously possible to baton smaller pieces of wood with a longer blade, although it might be a bit tricky, but you will not be able to baton thicker pieces of wood with a shorter blade. The thickness of the knife’s blade doesn’t make much of a difference in batoning, only the length of the blade matters.

Rigid knife handles will very often create uncomfortable vibrations when struck with a baton, but handles that are completely encased in a synthetic material (like rubber), will normally absorb the shocks reasonably well. Thus, the ideal batoning knife will also have a synthetic material handle. If the knife you intend to use does not have a synthetic material handle, to reduce the felt vibrations, handles can be covered with synthetic material like bicycle inner tube.

centered knife straight angleGerber Bear Grylls Parang Machete - Amazon

Proper Batoning Technique

When batoning, there are many ways to mitigate damage and potential breakage to your knife. Use these guidelines to attain proper batoning technique:

Center the knife in the middle of the piece of wood you are trying to split.

Place the knife straight down, and not at an angle, when getting ready to baton (this is very important to mitigate damage or breakage to the knife). Hit the center of the knife with the baton until the knife is properly lodged in the wood, then proceed to the next step.

Baton on the blade end of the knife, but do not hit the very tip of the blade when batoning, as the tip of the knife is usually relatively weak and susceptible to breakage. The metal of the knife should protrude from the wood far enough so that you can hit, not the tip, but a part of the spine that is strong enough to take the batoning.

Readjust the knife, correcting the blade orientation by making the knife straight again, if it happens to shift to an angle after having been batoned for some time. Make gentle, corrective taps to the handle end of the knife when batoning whenever the blade begins to stray from it’s original downward alignment. Do not hit the handle as hard as you would hit the blade end of the knife, as the force may cause the knife to break or be damaged, but feel free to make light hits to the handle end when you feel it is appropriate.

Troubleshooting Difficulties with Batoning

Other than using proper batoning technique, the following is a list of adjustments you can make to have an easier time batoning. Try using one or more than one if a particular piece of wood is giving you a hard time.

Baton with the grain of the wood, not against it.

If possible, baton around and not through knots in the wood, as knots create sometimes extreme resistance and can, in certain situations, damage the edge of the knife.

If the log already has a crack, take advantage of it, as mother nature has already done most of the work for you. Align the knife on top of the crack and go through as you would normally.

Move the piece of wood you are trying to baton to rest on the hardest surface you can find. Ideal surfaces include large rocks, a second log, or, in more urban settings, concrete.

Use a more appropriate knife (see the Ideal Batoning Knife section above).

If you simply cannot baton through a particular piece of wood, try batoning a smaller one (in terms of it’s diameter or radus), as batoning becomes easier with thinner pieces of wood.

Hardwood is of course much more difficult to baton through than softwood (like balsa). Adjust expectations accordingly in terms of expansion of energy, and if it doesn’t matter whether you have hardwood or softwood, switch to batoning a softwood instead. – The Prepper Journal

Read the original article on More Than Just Surviving

Survival Tools and Knives


4 Reasons To Choose A Low Power Rifle Scope

$
0
0

rifle scope

By Adam C

The world of rifles and more specifically, rifle scopes is filled with massive, cylindrical monstrosities of magnification that rival the Hubble telescope in size. It seems that whenever a shooting enthusiast gets a new rifle, the first thing he or she wants to slap on is the highest magnification scope that money can buy. The more magnification, the larger the objective, the better, right? Not necessarily – it really depends on your intended shooting activities, and that’s where you need to start being honest with yourself. First and foremost, decide what type of shooting you want to do, and then purchase a scope accordingly. Keep in mind that having extra capability is nice, but not all shooters will engage targets at 1,000 or more yards.

So why not just go for that big burly scope with the objective the diameter of a satellite dish? There are a few reasons why big scopes don’t always make the most sense, and why low magnification scopes are the better choice. Here are 4:

  • High magnification scopes are usually quite a bit heavier and bulkier than low power scopes.
  • High magnification scopes are substantially more expensive than low power scopes.
  • The higher the magnification, the larger the corresponding objective diameter, which usually means that taller scope mounts are required. Sometimes, this means that your cheek weld is shifted upwards, and you need to put a cheek riser on the gun – bottom line: Big scopes add complexity.
  • High magnification scopes are often unsuitable for medium and short-range work because their lowest power often is still a fairly high level of magnification which means that the field of view is narrower than it would be on a low power scope. All of this makes short range target acquisition more of a challenge.

Don’t get me wrong – if you need to shoot beyond 500 yards, you will definitely need a scope that’s up to the task. If you need to shoot to 1,000 yards and beyond, quality, high magnification glass is mandatory. All we’re saying is be honest with your goals, and that’s where low power rifles scopes come in.

In the past, low power scopes were far more common since optics technology hadn’t yet moved into the realm of the 25-30 power scopes we now commonly see. So what do we mean by “low power” anyways? Essentially, a variable power scope of between zero and six power magnification at the top end. Wait – zero magnification? Consider that a nice, bright scope with a carefully designed reticle – even one with no magnification at all – is a substantial improvement over iron sights. Add in some modest magnification, such as two to three times magnification, and now you have a radical improvement over target acquisition inside of 400 yards as opposed to someone shooting irons. As a matter of fact, you will have a marked advantage in this range as far as target acquisition speed goes than someone shooting even an eight power scope – your comparatively larger and wider field of view means body sized targets are easily spotted and acquired.

Low power scopes don’t need to be low quality, either; many premium scope manufacturers offer low power magnification scopes that are extremely well-designed. Bushnell, for example, offers a 1-4x rifle scope specifically calibrated for AR-15 series rifles that costs in the mid $200 range – this innovative scope offers fantastic glass and a first focal plane reticle in a small package. The fact that quality scope manufacturers are willing to delve into this marketplace, one which was previously filled with imported junk, is a testament to the efficacy and rising popularity of a low magnification scope.

Everything that’s old is new again, and low power compact scopes are no different. Once found exclusively on light, portable, carbine length rifles known as scout rifles, low power scopes are making a huge comeback for the short range game. But why not just buy a red dot or holographic sight like an Eotech or Aimpoint if a low power sight is required? Simple – because red dot or holographic sights still don’t have the functionality of a proper scope with a ranging reticle and target turrets that are quickly adjusted. Sure, red dots and holographic sights rule inside of 100 meters, maybe even 200 meters, but between 200 and 500 meters, the red dot will start to obscure the target, and the holographic site will run out of resolution horsepower in order to make any kind of corrections for range. Bottom line: low power scopes are still more flexible and have more potential applications than either red dot or holographic sights.

Don’t take our word for it, however. Try a low power scope on your rifle before you try anything else. First off, you will spend less on a low power scope than you would on a red dot or holographic sight, and far less than you will spend on a high magnification scope, and chances are you will be just as happy – if not happier – than if you had bought something else. – Off The Grid News


Top 5 Overlooked Items You Need In Your Winter Survival Kit

$
0
0

Snow_Car_Stuck

By

Every survival kit has a few holes that need to be filled, and winter survival kits tend to suffer from this more than most since they’re only used for part of the year. These top 5 picks are pretty easy to forget, but if disaster strikes you’ll be glad you had them!

5. Dry Thermal Underwear!

I have seen people who will pack an entire set of extra clothing, but leave out the bottom layer that is most important. Thermals are great for trapping air and wicking sweat away from your body, preserving body heat. If possible pack two pairs, since generally speaking thermal underwear isn’t all that bulky or heavy.

Extra thermal underwear helps keep you warm, even if you need to change out of wet clothes.

4. Emergency hand warming packs

Perhaps these seem more like a convenience, and generally they are. However, if your hands should become so cold that you can’t move them properly when you need to, a hot pack or two should help restore their dexterity. Furthermore, they can be used in conjunction with insulated clothing and blankets to add heat and keep you warm for a while longer. I recommend focusing on brands that last longer rather than having greater heat. When you’re freezing, any amount of heat will be useful and you want ones that will last as long as possible!

A few hand warmers can restore full dexterity to your hands even in the coldest weather.

3. A High-Quality Avalanche Shovel

No, not the little snow shovel for clearing your front steps off. A good avalanche shovel is made to move a lot of snow without snapping or breaking from the strain. It can be used to save people who are buried when building a snow cave, if your vehicle becomes trapped, to construct snow walls to block icy winds, and of course to save people buried by an avalanche. A little more weight in this particular case isn’t a bad thing, so go with a more durable aluminum model over the lighter plastic.

An avalanche shovel is great for many applications, including building a snow shelter!

2. Salt and Sugar

Yes, the same stuff you put on your fries or into your cakes. Sugar gives your blood sugar a boost, which can improve vision and keep your energy up. Salt can also be added to food or for an emergency electrolyte solution, but even more importantly it can be added to a small amount of water and used to de-ice in an emergency. Better still, they take up very little room and can even be carried in a coat pocket if you wish.

Salt and sugar have both proven useful in emergencies, so keep a few packets with your winter survival kit!

1. Garbage Bags

Black trash bags are awesome if you end up stranded in a snow cave, your car, or other stationary position for awhile. Simply place one garbage bag over your head, punching a few holes for your arms and head, and then put another bag over your legs without putting holes in it. This effectively acts as another thin but powerful layer that helps to trap body heat. As another plus, it is also waterproof and will help keep you dry if melting snow starts to drip on you.

A few black trash bags can help keep you warm and dry in an emergency.

Your Thoughts?

Can you think of any other overlooked items that should be in everyone’s kit? Let us know in the comments!


The Problem with Prepping

$
0
0

BlastDoors

By

Don’t Fool Yourself into Thinking You Have Nothing to Worry About

Preppers can fairly quickly find themselves at the mercy of our own minds. We create the need and the solution in our lives by analyzing threats and weighing the likelihood of various disasters – natural and man-made and then craft plans for how we will deal with those disasters when they come. The problem comes when we analyze the disasters and settle upon a strategy that we think will either protect us completely or mitigate all of the undesirable effects of that crisis we are planning for. This is an issue that I think a lot of Preppers face and ignoring it can get you in just as much trouble as someone who has never prepped before. You might meet the same fate, just at different times. The problem with Prepping is that you can never be finished.

I thought about this as I was compiling my latest list of items that I either needed to acquire or wanted to sort out in my life. I even started to draw small boxes to the left of the items on my list so that when I had finished the various elements of my survival checklist, I could mark each box as complete. A fully completed list meant that I was done, right? That I would never have to worry about any of these particular issues again is how some people choose to look at making lists.

All I need is 6 months’ worth of food

So the grid goes down like it did in American Blackout and you are locked up snug as a bug in a rug inside your house. The power has been off for a week so far, but you have that covered. You also had 6 months of food inside your pantry so you should be all set, right? Wrong… If the power never comes back on or we descend into something worse, what happens when your food runs out? What if your brother from the next state rolls into town and starts to eat your food too?

Having a stocked pantry doesn’t mean you will live forever. In order to be truly prepared, you have to be able to feed yourself forever. Does that look like starting a vegetable garden or getting started with small livestock like raising chickens? What about Aquaponics? The process of feeding yourself and your family never stops until you die.

The idea here is that you can’t go out and buy a whole pallet of freeze-dried emergency foods and expect that you are finished. Having a great supply of food so that you can outlast most any temporary crisis can give you a huge leg up, but is not a magic bullet.

I just need an awesome Survival arsenal and I can handle anyone

I own guns and I have written several articles about various aspects of gun ownership like “The Best Gun for Home Defense” and “How to Select the Best Handgun” and another about what I consider our “Obligation to Carry Concealed“. We talk about storing ammo and the different calibers you need for different aspects of security and survival but simply having a lot of guns does not mean you will be safe.

Guns are an important part of my survival plans, but simply having one strapped to my side doesn’t or should not give me a false sense of security. This is a tool and that is all. With a firearm I will have the opportunity to react in ways that I otherwise wouldn’t. This isn’t an invisible shield against violence; it won’t protect me from dedicated bad guys or the stupid actions I may take myself. There is so much more to security than simply having a bang stick and we are all wise to temper our bravado in the face of disaster just because we bought a gun. This can go the same way for bad guys too who get cocky when they have a firearm. Just because you have a gun that doesn’t mean someone can’t walk up behind you and put their own bullet in the back of your skull.

I have backup generator

A generator is another one of those great tools we talk about often and I have one. Does that mean I will have power for the rest of my life? Nope. Actually, I would be really happy with 500 hours of run time out of the generator. I have plenty of fuel stored up and oil, but mechanical things break eventually. If you don’t have spare parts or more importantly the know-how to fix a generator, you have to look at this as a finite resource.

A backup power plan is excellent and I have one myself with further plans for solar backup, but this isn’t something I can count on to completely replace all of the power we have grown used to. Even if it was, in a complete grid-down scenario people would know that you have power unless this was hyper secret. Small chance of that with a generator but eventually everyone will know you have power and then we get back to that survival arsenal we spoke about earlier.

I have a hidden survival retreat

A well-stocked retreat somewhere deep in the woods is the Holy Grail of Prepping Legend and Lore. Seriously, I covet those who have the resources to purchase a retreat property with all of their gear pre-staged in place even more those that are able to live at their retreat year-round. Even if you do have a compound with electric fence, intrusion detection, mines, roving guard dogs, sentries in the watch towers on Barrett 50 cal rifles, that still does not guarantee you will ever live in peace the rest of your life.

That is one helluva head start though!

My point is that nowhere and no situation will stay completely safe forever. Are you possibly months, or years away from worrying about the same thing people in New York will be faced with? Perhaps, but to think you will stay hidden away forever without any other single living person coming across your path is far-fetched in my opinion. If you have this retreat, you will still have to guard against others who find out about what you have and want to separate you from your castle.

I have a Bug Out Vehicle

Great! So what? A bug out vehicle is only as good as where it can get you. If you are stranded in the city because you didn’t get out in time, what good is that vehicle? If it is parked on the highway in traffic what does that do to your plans?

Having a bug out vehicle is important; especially if you need to get to your survival retreat up above but simply having a tricked out Ford F250 running diesel or bio-fuel doesn’t mean that you can’t be stopped. Having that big truck doesn’t guarantee you won’t have some type of mechanical failure or be disabled by someone else in a big truck.

OK, so what good is prepping then?

My whole point with this article is that you can’t become complacent. My list that I was filling out was for the day, not eternity. If I buy some extra food today, that is like a deposit in the extra time bank. By having supplies I am buying myself and my family extra time, but I can’t teleport us out of any emergency that appears with freeze dried food. I can’t change the fact that the electric grid is wiped out (as an example) just because I have 500 gallons of water stored.

I have said it before and I’ll say it again. Prepping is a Journey, not a destination. You will never be completely prepared for anything. You can only work at being more prepared than you were. You can strive for being better prepared than you were a year ago. What you can’t do is think that you are done and that you can sit back and relax. Prepping is done by people who see trouble ahead and take steps to deal with that trouble. Chances are, that trouble isn’t going to go away and neither should your dedication to staying ready and striving for more self-sufficiency and resilience. You very likely will never be as prepared as you want to be, but that journey will pay you back when the time comes. – The Prepper Journal


7 Tips to Keep You Alive and Found in the Wilderness

$
0
0

7 Tips to Keep You Alive and Found in the Wilderness

By Todd Walker

Get out there! Spend enough time with Mother Nature and you’ll likely experience emergencies.

Even the most innocent outings are potential survival situations. That fishing trip can turn nasty for all the wrong reasons. Your day hike may find you sleeping under the stars with a busted knee.

Always carry a minimal what-if emergency kit. With these tools, a survival mind-set, and Doing the Stuff skills, you increase your odds of staying alive and being found.

A.) Mindset Training

No matter the crisis or survival situation, your ability to come out on the other side alive is largely dependent upon your attitude. Recognizing that there will be added stress – mental, physical, emotional, and spiritual – is your first step.

Let us train our minds to desire what the situation demands. – Seneca the Younger

All your other skills will be affected by your mindset. Obviously, the more skills and knowledge you have, the more comfortable you’ll be when starting a fire to stay warm when your lost in the wilderness. Being collected enough to start a fire not only provides physical life support but boosts morale.

The more you practice skills, the more you’re attitude improves. Doing the Stuff beforehand keeps panic at bay.

B.) There’s No “I” in Team

This clever slogan adorns team t-shirts and locker room walls in the world of sport. Unfortunately, the saying won’t work on surv”I“val. There it sits, smack dab in the middle of the word!

In some cases, “I” is all you have. This scenario requires you to be a team of one – without a camera crew filming or emergency personnel standing by. You’ll have to survive on your wits and create your own ‘luck.’

C.) Resilient First Aid

Injuries happen. A scrap becomes infected. A misstep twists your ankle. Now you’ve become the doctor. All the more reason to pack a basic first aid kit. Learning basic first aid builds resilience.

The larger threat in wilderness survival situations is hypothermia and hyperthermia. Getting cold and wet leads to hypothermia. You’re ability to make sound decisions is reduced when your body’s core temp drops.

D.) Improvised Emergency Shelter

I’ve said this before, but it’s worth repeating. Mother Nature is temperamental. She likes to see how much hell you can handle while visiting her “house.”

Humans aren’t built for prolonged exposure to nature’s elements. We require shelter. We may stumble upon a cave if one is available. But one advantage we have over our furry critter friends is our ability to use logic and reason to survive.

Any crisis over a couple of hours in wet, cold conditions will likely escalate into a life-threatening setting. Shelter is more important than water in this case. Humans can only go three hours without shelter. Having experience in building emergency shelter can save your life. If you’re caught without a piece of plastic or a tarp, you’ll have to improvise and use what nature provides.

Here’s some ways to build a temporary ‘home’ in the wilderness…

E.) Fire

7 Tips to Keep You Alive and Found in the Wilderness

The ability to make fire is everything in the wilderness. This skill aids in cooking, purifying, heating, signaling, security, and comfort. Fire affects all your other physical and emotional steps to survival and rescue.

Fire is life!

F.) Signaling Rescuers

This one doesn’t get much attention but may be your best hope of being found alive. A series of 3 of anything (sound or visual) let’s search and rescue know you’re in distress. Three whistle blasts, rocks, logs, and/or fires. Use fire at night and smoke during the day. Be sure not to set the surrounding forest ablaze.

If you want to be found, leave a trail or signs for search and rescue. Leave a bandana or strip of cloth hanging from branches if ground rescue is involved. Also build arrows with natural or man-made material to indicate your travel direction.

For ground-to-air rescue, find an opening or clearing and create large signals with straight lines and 90 degree angles or circles. Use logs or rocks that contrast with the background. Build a log cabin fire setup with dry tinder and fuel in the bottom and green leafy material on top that will produce lots of smoke. Fire it up when you hear airplanes or helicopters.

Number Message Code Symbol
1 Require Assistance V
2 Require Medical Assistance X
3 Proceeding in this Direction
4 Yes or Affirmative Y
5 No or Negative N

The above chart indicates to rescue how to proceed. Use any available contrasting material to make these symbols a minimum of 3 feet wide and 18 feet long to alert aircraft.

Shiny Object Signaling

A signaling mirror or any shiny object will work to alert pilots. Reflected sunlight can be seen for several miles. For more details on signaling with shiny objects, Creek Stewart shows you how to improvise here.

Always leave the 3 W’s with a trusted friend or family member:

  1. Where you’re going
  2. When you plan on returning
  3. Who’s in your group.

[I intentionally left water and food out of this post. Well, to be honest, I'm running short on time and don't have the energy to cover these in this post.  We'll chew on these later.] – Survival Sherpa

Keep Doing the Stuff!

You can also connect with us on TwitterPinterest, and our new Facebook page.


Viewing all 77 articles
Browse latest View live